
Step-by-Step guide for self measurements
Remote Measurement Guide
Follow these steps to take accurate self-measurements for a professional-grade fitting. Careful execution will help ensure precision.
You will need:
Chair or stool – Set up in your usual operatory environment (unit light, tray, typodont, or a cooperative “patient”).
Measuring tools – A rigid millimetre ruler (or PD ruler), masking tape, string, or a tape measure.
Camera setup – A digital camera or high-resolution smartphone, with a tripod for stability, positioned 30–40 cm from your face.
Lighting – Even, shadow-free illumination; natural daylight is preferred when available.
Environment – A quiet space that replicates your typical working conditions.
Helper (optional) – An assistant to aid in taking measurements for greater accuracy.
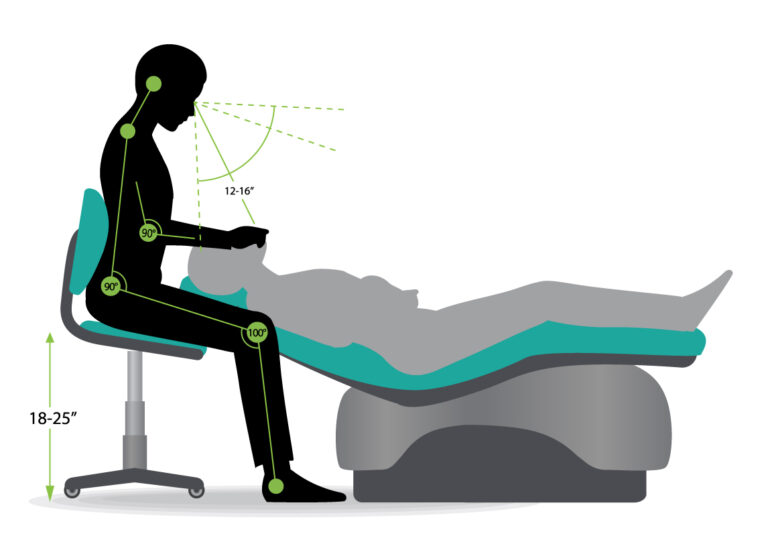
Step 1 – Posture Setup
Adjust your chair and patient head height exactly as you would for treatment.
Sit or stand upright with relaxed shoulders, elbows at roughly 90°, and forearms close to your body.
Keep your neck in a neutral position (no more than ~20° forward flexion) and direct your gaze slightly downward toward the treatment field.
Maintain this position throughout all measurements—this is the foundation for accuracy.
Tip: If your posture changes later, your loupes will no longer feel correctly aligned. Take a moment now to get it perfect.
Step 2 — Measure your Working Distance (WD)
Your working distance is the straight-line measurement from your eyes to the treatment site.
How to measure:
Secure one end of a string or tape measure at the bridge of your nose (between your eyes).
In your normal working posture, extend the string to the centre of your typical treatment field (e.g., the incisal edge of the upper central incisors or the tooth you work on most frequently).
Record the distance in millimetres.
Repeat this process 3–5 times and calculate the average.
Selecting your WD:
Typical working distances range from 450 to 550 mm.
Choose the standard WD closest to your average, rounding up (never down).
Example: If your average is 507 mm, select 520 mm.
Step 3 — Measure your Pupillary Distance (PD)
- Digital Method including websites and Apps provide an easy way to measure your PD
Ruler measurements
- Get a millimeter ruler and sit or stand in front of a mirror.
- Look straight ahead and put the ruler horizontally in front of your nose.
- Measure the distance between the centers of each pupil to the center of your nose bridge individually.
- Record both measurements as your dual PD value, noting the right eye (OD) measurement first, followed by the left eye (OS) measurement.
- If both measurements are the same, you have a single PD. In this case, add the measurements together to obtain your single PD value.
- Repeat the process a few times to ensure accuracy.
Take 3 readings and average. Expect adult PD ~58–70 mm; R-PD and L-PD usually differ a little.

Step 4 — Facial measurements
To take the measurement we need a picture as shown below of the front your face. The camera needs to be 40cm away from your face and a ruler held in the positions shown.
Step 5 —Submitting Your Order
Once you have completed all the measurements, please send them to info@easyee.co.uk or via WhatsApp to +44 7414 788859.
Our remote modelling process is highly accurate, allowing us to offer a Guaranteed Fit Service. When you receive your loupes, you’ll have a 30-day trial period during which we can make any necessary adjustments free of charge.
If you encounter any difficulty taking the required photos or need clarification at any stage, please contact us—we’re here to help.
Please include the following information in your order:
Working Distance (WD): ____ mm (average of ___, ___, ___) → Chosen WD: ____ mm (nearest standard, rounded up)
Binocular PD: ____ mm
Monocular PD: Right ____ mm, Left ____ mm
Model, Frame Type & Magnification: ___________________
Prescription details (if required): ___________________